- PRODUCTSFREEWAREFOR COMMERCIAL USEFOR PERSONAL AND BUSINESS USEBackup and System Restore:PC Privacy and Security:
- BUY ONLINE
- DISTRIBUTION
-
File Recovery from an External Disk with a Damaged, Deleted, Formatted, or Unsupported File System


This article will show how to recover files from an external hard disk with a damaged file system, but the same technique can be used for file recovery from accidentally deleted or formatted disks, or retrieving files from disks with file systems that Windows doesn’t support, for example Apple's HFS+. The procedure is generally the same for all those cases with slight differences which we'll show in the corresponding points.
You may also read our articles:
So, what do you have to do to get deleted files back?
Photo Recovery from a Deleted, Damaged or Formatted Digital Camera Memory Card
HD Video Recovery from SD cards
R-Undelete: File recovery from a non-functional computer
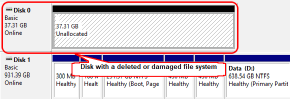
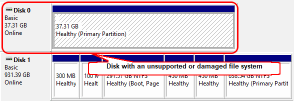
The most probable cause for file system damage on an external disk is its improper removal from a computer. All operating systems have a special "eject" command which prepares the disk to be disconnected from a computer. This ensures that the computer is not writing anything on the disk when it is disconnected. If the operating system is accessing the disk when it is removed, the disk's file system may be damaged, and the files on the disk may become inaccessible. The computer will be unable to recognize the file system or may see it as an empty disk. Windows Disk Manager shows such disk as unallocated space or as a partition with an unsupported file system (no disk letter is assigned), and Windows may ask you to format it when attempting to access it.
Click image to enlarge
Click image to enlarge
Fig.1. Disk with a damaged, deleted, or unsupported file system in Windows Disk Manager
Although it looks like the files on such a disk have been completely wiped out or lost, in most cases, they haven't been. Some or all your files may still be on the disk, even if the operating system doesn't see them. R-Undelete is a file recovery program that helps you to "see" those files, find, and recover them. Below we will show how to do that in several easy steps.
Before we begin file recovery:
First and foremost: Don't panic! In most cases you will be able to get your files back. You don't have to be a computer expert for successful file recovery. Still, we recommend you read our article "File Recover Basics" to better understand how file recovery works and what it can and cannot do.
1. Check that the disk has no hardware problems. And if it has, stop any further file recovery attempts by yourself and seek out a help from a professional data recovery specialist. Beyond checking that the cables are firmly connected, any "do it yourself" file recovery efforts may actually worsen your chances of recovering the data if your disk has a serious physical malfunction. Signs that a disk has a physical failure include:
- The system does not recognize the device at all, or it appears with an unusual or garbled name.
- A S.M.A.R.T. (Self-Monitoring, Analysis and Reporting Technology) utility (R-Undelete, for example) warns that a severe hardware failure event has occurred.
- The hard drive makes unusual noises, clicks, or takes a very long time to spin up and initialize.
- Bad blocks continually appear on the drive.
All these cases are best handled by qualified data recovery professionals only. They have special equipment, software, and, most important, the required skills to work with such drives. Neither R-Undelete, nor other data recovery software will help you in such cases. Moreover, any further tampering with such a drive will surely inflict more damage to your files. Quite often, such damage will render the files completely irrecoverable
2. Find enough room to store recovered files. They will be copied from the original disk to that place. R-Undelete can save files on any local or network disk visible by your computer.
Download and install R-Undelete. You don't have to buy it immediately. File recovery from FAT/exFAT disks is free, however for the NTFS, you may start in Demo mode and check whether R-Undelete can recover your files or not. If R-Undelete predicts the file recovery will be successful, you may buy and register on-the-fly without interrupting the file recovery process.
4. Connect the external disk to your computer. It's better to use the fastest eSATA (external SATA) connection, but a USB3.0 will also do. USB2.0 is much slower and more time may require for the file recovery process.
Now we can start actual file recovery:
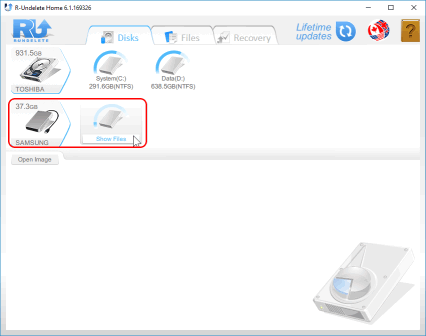
1. Locate the disk with the damaged file system
Most likely, R-Undelete will show it as a disk with an unrecognized or unallocated space. A deleted disk will be shown as an unallocated space.

Click image to enlarge
Fig.2. Disk with a damaged file system in R-Undelete
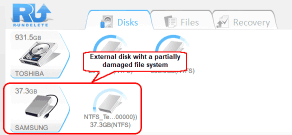
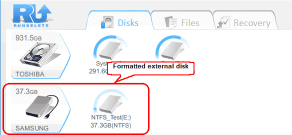
Sometimes, a partially damaged disk may appear as a disk (partition) without an assigned disk letter. A formatted disk looks the same way, only it has the disk letter.
Click image to enlarge
Click image to enlarge
Fig.3. Partially damaged and formatted disks in R-Undelete
We'll show how to recover files in such cases a little bit later in the File recovery from formatted disks or disks with partially damaged file systems section. If this is your case, you may jump to this section right after you've read about disk S.M.A.R.T. check.
For all cases, we advise you to check its S.M.A.R.T. attributes first to be sure that the disk is in a healthy state. To do so, right-click the icon of the hard drive and select Show S.M.A.R.T. on the shortcut menu.
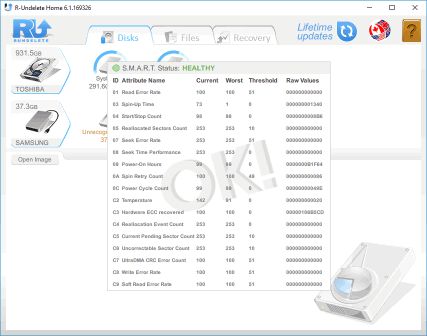
Click image to enlarge
Fig.4. S.M.A.R.T. attributes for the disk with a damaged file system
As the hardware state of our disk is good, we can proceed further with file recovery.
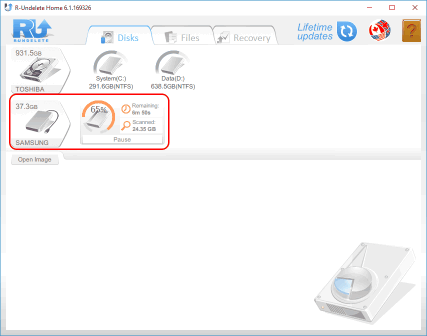
2. Scan the disk
Move the mouse over the Unrecognized / Unallocated space icon and select Scan.

Click image to enlarge
Fig.5. Disk scan start
R-Undelete will start scanning the unrecognized / unallocated space showing its progress.
Click image to enlarge
Fig.6. Disk scan progress
Depending on your hardware, scan time may vary, even within the same scan process, and may be quite lengthy for large disks. The scan may be paused then resumed it by clicking the Resume scan button.
When R-Undelete finishes the scan, it will show the results.
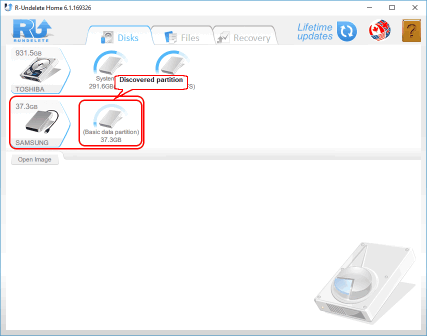
Click image to enlarge
Fig.7. Discovered partition
Depending on how the original file system was damaged, the resulted icon and text may be slight different, but the following procedure still will be the same.
3. Find lost files and mark them for recovery
Move the cursor over the found partition and select Show files on the shortcut menu.
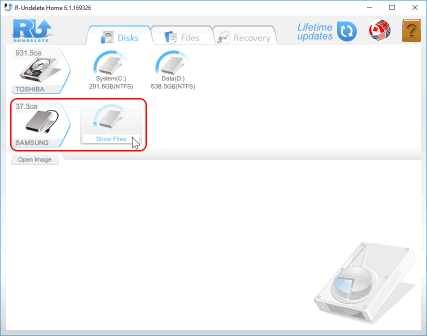
Click image to enlarge
Fig.8. Disk scan result
R-Undelete will start searching for files on the disk. This may take a while, depending on how large your hard drive is.
View the found files on the external hard drive once R-Undelete finishes searching for lost files.
Click image to enlarge
Fig.9. Found files
Now it is necessary to find the files you want to recover. R-Undelete gives you several ways to do that.
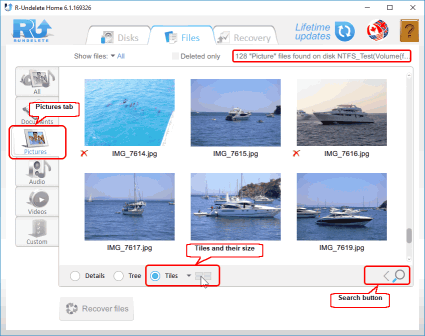
By sorting files by their types
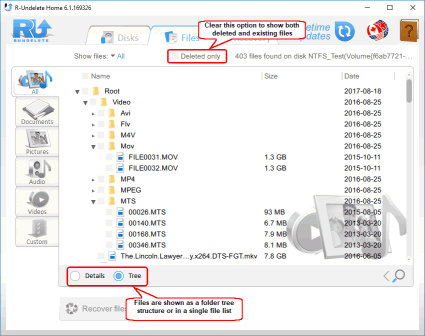
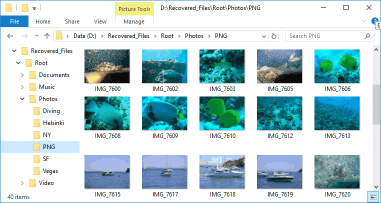
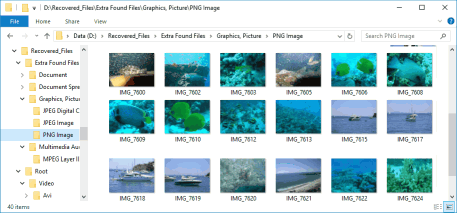
R-Undelete presorts files by most common file types and places them to the corresponding tabs. For example, we may select the Pictures tab, if the most files we're going to recover are images. This tab has an additional and default option to display image files: tiles. Click the tab, select Tiles, and their size:
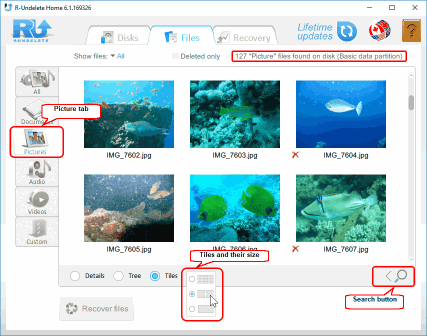
Click image to enlarge
Fig.10. Pictures tab
By manual searching for individual files or file groups:
You can also find files by searching for them manually. To do so, click the Search button, specify the file name or file mask, click the Start button, and only the matched files will be shown. File search is done on the files on the current tab. Select the All tab to search among all files.
For more detailed instructions for sorting and creating manual search, refer to the R-Undelete: File Search and File Sorting online help pages.
Viewing files:
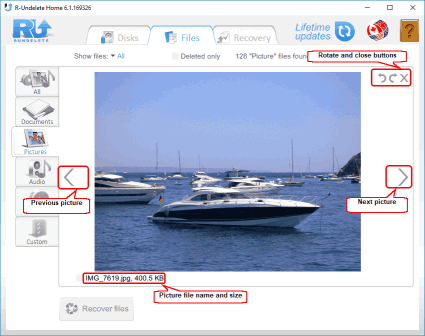
You may use the built-in viewer to estimate chances for successful file recovery or to find the necessary file to recover. Right-click the file to view it.
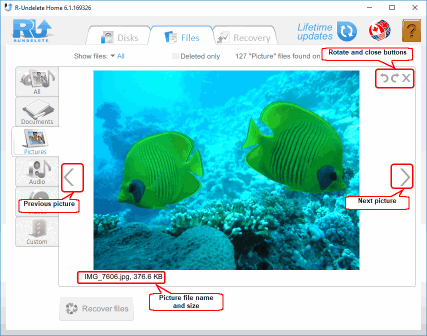
Click image to enlarge
Fig.11. Picture view
Close the viewer to return to other files.
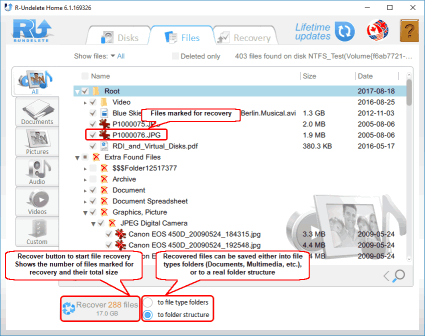
When your lost files are found, mark them for recovery:

Click image to enlarge
Fig.12. Files marked for recovery
4. Recover the marked files
After marking the required files for recovery, sufficient storage space on another disk should be available to save them.
Never save the recovered files on the place where they were located, or you may completely lose them!
Select the way R-Undelete saves the files: either into the file type folders or to the real folder structure.
When all the necessary preparations are made, click the Recover button to start file recovery.
If necessary, register R-Undelete. This procedure can be done on-the-fly even during file recovery operations. The program doesn't have to be restarted. Refer to the R-Undelete: Upgrade online help page for more details.
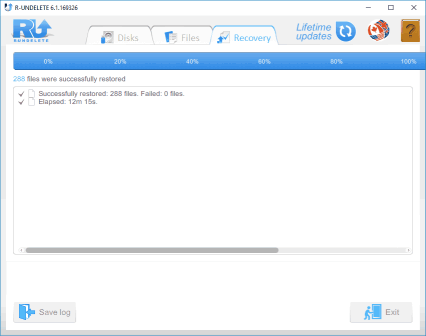
When R-Undelete finishes the process, it will display a brief report of its results,
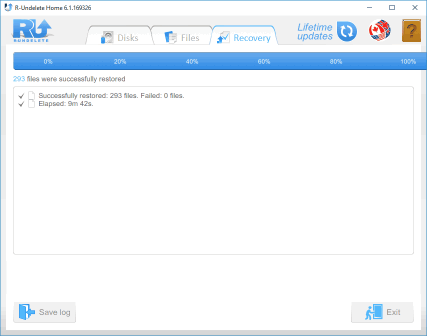
Click image to enlarge
Fig.13. Recovery results
and the folder with recovered files will be automatically opened.
Click image to enlarge
Fig.14. Recovered files
File recovery from formatted disks or disks with partially damaged file systems
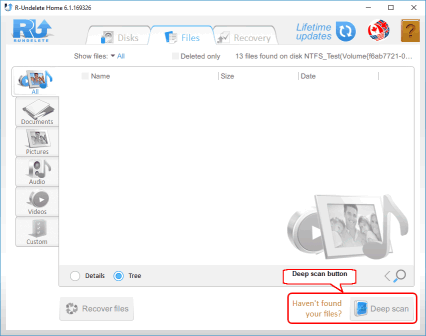
1. Open files on the required partition
Move the cursor over the necessary disk / partition and select Show files on the shortcut menu.
Click image to enlarge
Fig.15. Show files
You will usually not immediately find all the files you're looking for. Quite often you will see no files at all.
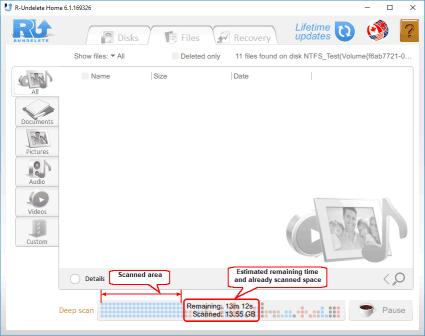
2. Deep scan the partition
Click the Deep scan button
Click image to enlarge
Fig.16. Deep scan button
and wait for R-Undelete to complete the scan.
Click image to enlarge
Fig.17. Deep scan progress
This may take a while, depending on how large your hard drive is.
3. Find lost files and mark them for recovery
View the found files on the external hard drive once R-Undelete finishes searching for deleted files.
Click image to enlarge
Fig.18. Found files
Now it is necessary to find the files you want to recover. R-Undelete gives you several ways to do that.
By sorting files by their types
R-Undelete presorts files by most common file types and places them to the corresponding tabs. For example, we may select the Pictures tab, if most files you're going to require are images. This tab has an additional and default option to display files: tiles. Click the tab, select Tiles, and their size:
Click image to enlarge
Fig.19. Pictures tab
By manual searching for individual files or file groups:
You can also find files by searching for them manually. To do so, click the Search button, specify the file name or file mask, click the Start button, and only the matched files will be shown. File search is done on the files on the current tab. Select the All tab to search among all files.
For more detailed instructions for sorting and creating manual search, refer to the R-Undelete: File Search and File Sorting online help pages.
Viewing files:
You may use the built-in viewer to estimate chances for successful file recovery or to find the necessary file to recover. Right-click the file to view it.
Click image to enlarge
Fig.20. Picture view
Close the viewer to return to other files.
When your deleted files are found, mark them for recovery:
Click image to enlarge
Fig.21. Files marked for recovery
4. Recover the marked files
After marking the required files for recovery, sufficient storage space on another disk should be available to save them.
Never save the recovered files on the place where they were located, or you may completely lose them!
Select the way R-Undelete saves the files: either into the file type folders or to the real folder structure.
When all the necessary preparations are made, click the Recover button to start file recovery.
If necessary, register R-Undelete. This procedure can be done on-the-fly even during file recovery operations. The program doesn't have to be restarted. Refer to the R-Undelete: Upgrade online help page for more details.
When R-Undelete finishes the process, it will display a brief report of its results,
Click image to enlarge
Fig.22. Recovery results
and the folder with recovered files will be automatically opened.
Click image to enlarge
Fig.23. Recovered files
Conclusion
All the examples above show that R-Undelete is a quite effective tool for recovering files from disks with damaged, deleted, formatted or even unsupported file systems. At the same time, such recovery is easy and doesn't require any deep knowledge of file recovery, as many file recovery programs do. Furthermore, R-Undelete recovers files from FAT/exFAT storage devices, like SD cards or external hard drives, without registration, that is, for free.
- R-Studio Technician: activation using a USB stick
- Data Recovery Guide
- Why R-Studio?
- R-Studio for Forensic and Data Recovery Business
- R-STUDIO Review on TopTenReviews
- File Recovery Specifics for SSD devices
- How to recover data from NVMe devices
- Predicting Success of Common Data Recovery Cases
- Recovery of Overwritten Data
- Emergency File Recovery Using R-Studio Emergency
- RAID Recovery Presentation
- R-Studio: Data recovery from a non-functional computer
- File Recovery from a Computer that Won't Boot
- Clone Disks Before File Recovery
- HD Video Recovery from SD cards
- File Recovery from an Unbootable Mac Computer
- The best way to recover files from a Mac system disk
- Data Recovery from an Encrypted Linux Disk after a System Crash
- Data Recovery from Apple Disk Images (.DMG files)
- File Recovery after Re-installing Windows
- R-Studio: Data Recovery over Network
- How To Use R-Studio Corporate Package
- Data Recovery from a Re-Formatted NTFS Disk
- Data Recovery from an ReFS disk
- Data Recovery from a Re-Formatted exFAT/FAT Disk
- Data Recovery from an Erased HFS Disk
- Data Recovery from an Erased APFS Disk
- Data Recovery from a Re-Formatted Ext2/3/4FS Disk
- Data Recovery from an XFS Disk
- Data Recovery from a Simple NAS
- How to connect virtual RAID and LVM/LDM volumes to the operating system
- Specifics of File Recovery After a Quick Format
- Data Recovery After Partition Manager Crash
- File Recovery vs. File Repair
- Data Recovery from Virtual Machines
- How to Connect Disks to a Computer
- Emergency Data Recovery over Network
- Data Recovery over the Internet
- Creating a Custom Known File Type for R-Studio
- Finding RAID parameters
- Recovering Partitions on a Damaged Disk
- NAT and Firewall Traversal for Remote Data Recovery
- Data Recovery from an External Disk with a Damaged File System
- File Recovery Basics
- Default Parameters of Software Stripe Sets (RAID 0) in Mac OS X
- Data Recovery from Virtual Hard Disk (VHD/VHDX) Files
- Data Recovery from Various File Container Formats and Encrypted Disks
- Automatic RAID Parameter Detection
- IntelligentScan Data Recovery Technology
- Multi-pass imaging in R-Studio
- Runtime Imaging in R-Studio
- Linear Imaging vs Runtime Imaging vs Multi-Pass Imaging
- USB Stabilizer Tech for unstable USB devices
- Joint work of R-Studio and PC-3000 UDMA hardware
- Joint work of R-Studio and HDDSuperClone
- R-Studio T80+ - A Professional Data Recovery and Forensic Solution for Small Business and Individuals Just for 1 USD/day
- Backup Articles
- R-Drive Image Standalone and Corporate license transferring
- Fixing Windows update error 0x80070643 with R-Drive Image
- Backup with Confidence
- R-Drive Image as a free powerful partition manager
- Computer Recovery and System Restore
- Disk Cloning and Mass System Deployment
- Accessing Individual Files or Folders on a Backed Up Disk Image
- R-Drive Image startup / bootable version
- File Backup for Personal Computers and Laptops of Home and Self-Employed Users
- Creating a Data Consistent, Space Efficient Data Backup Plan for a Small Business Server
- How to Move the Already Installed Windows from an Old HDD to a New SSD Device and Create a Hybrid Data Storage System
- How to Move an Installed Windows to a Larger Disk
- How to Move a BitLocker-Encrypted System Disk to a New Storage Device
- How to backup and restore disks on Linux and Mac computers using R-Drive Image
- Undelete Articles
- Get Deleted Files Back
- Free Recovery from SD and Memory cards
- R-Undelete: Video Recovery
- Recovery from an External Device with a Damaged File System
- File recovery from a non-functional computer
- Free File Recovery from an Android Phone Memory Card
- Free Photo and Video File Recovery Tutorial
- Easy file recovery in three steps
Rating: 4.9 / 5
This is the easiest and the quickest data recovery software I have come across. I had to recover photos and videos out of the corrupted SD card, I tried other paid software which takes 8 hours of the deep scan to come up with less than 50% of data to recover.
R-Photo did that in a few minutes and recovered more than 35 GB of photos & videos in less than an hour, without missing a single file.
Highly Recommended.