- PRODUCTSFREEWAREFOR COMMERCIAL USEFOR PERSONAL AND BUSINESS USEBackup and System Restore:PC Privacy and Security:
- BUY ONLINE
- DISTRIBUTION


-
R-Undelete: File recovery from a non-functional computer


You may read about how to recover files on other cases:
Get Deleted Files Back
Free Recovery from SD and Memory cards
Free HD Video Recovery from SD cards
File Recovery from an External Disk with a Damaged, Deleted, Formatted, or Unsupported File System
Almost every user at some point discovers that his/her computer refuses to work any more. Well, the computer can be repaired or replaced, but how does one retrieve all those valuable files, like family photos, music and movie collections, together with financial docs that it stores? This article will give you a detailed step-by-step guide on what to do to get them back using a file recovery program R-Undelete.
Problem Identification
For the first step, we need to identify the source of the problem. Is this a faulty computer's hardware or software (an operating system crash, for example)?
- Symptoms that the computer cannot start because of faulty software: the computer powers on, the start-up procedure begins, Windows starts loading, but then stops, and computer either hangs or goes to restart. In this case, the files can be recovered using R-Studio Emergency. Our article Emergency File Recovery Using R-Studio Emergency describes this procedure. In addition to that article, we recommend you to check the disk's S.M.A.R.T. status before file recovery.
- Symptoms that the computer cannot start because of faulty hardware: the computer doesn't power on, you hear unusual beeps during startup, the startup procedure abruptly interrupts, the computer throws warning about malfunctioning hardware components, etc. In this case file recovery requires some operations with computer hardware. You have to remove the disk from the faulty computer and connect it to a working one.
But before we proceed further, you should take into consideration two things:
1. You should have some skill in working with computer hardware.
2. Watch the warranty seals. If they are removed the computer's warranty may be void.
Preparing a working computer for file recovery
1. Download and install R-Undelete. You don't have to buy the program immediately. You may wait until you're sure that you can recover your files. Then you can register R-Undelete on-the-fly.
2. Check that you have enough disk space to store recovered files. R-Undelete can save files on any local or remote disk visible to the operating system.
Preparing the disk for file recovery
1. Open the computer case and remove the disk. It's quite easy for a desktop PC, but there may be some difficulties when opening a laptop case.
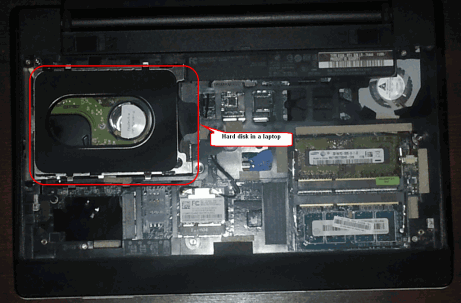
Fig.1. Hard disk in a laptop
Click image to enlarge
2. Connect the disk to the working computer. You may use either a USB/SATA adapter,
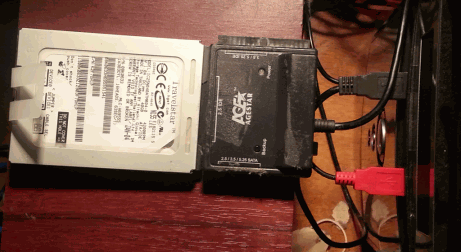
Fig.2. Disk connected to a computer through a USB/SATA adapter
Click image to enlarge
or connect it directly using a SATA cable.

Fig.3. Disk connected to a computer through a SATA cable
Click image to enlarge
Note that you should connect the disk through a SATA cable only when the computer is on the power-off state.
File recovery from a removed disk
1. Start the computer.
Check that the disk doesn't show any sign of hardware fault:
- Your system does not recognize the disk, or it appears under an unusual name.
- The hard disk makes unusual noises, clicks, starts too slowly.
- S.M.A.R.T. inspecting programs report a severe hardware failure event.
Important! If you believe that the hard disk is malfunctioning, DO NOT DO ANYTHING WITH IT BY YOURSELF ANYMORE! Don't try to run a scan or recovery procedure. Don't try to use some other data recovery software. Remember, tampering with a disk in this condition will surely inflict more damage to your files. At best, you'll have to pay extra money to a professional data recovery service. At worst, you'll lose all your files for good. Bring the disk to qualified data recovery professionals. They have special equipment, software, and, most important, the required skills to work with such disks.
2. Try to find the disk in Windows Explorer.
If its file system is not damaged, Windows Explorer will show folders and files on it and you can just copy them without using any file recovery program. But before we strongly recommend you to check disk's S.M.A.R.T. status to see whether its conditions allow you to work with the disk. You may use R-Undelete for that. Below is described how.
3. If Windows Explorer cannot show files on the disk, open R-Undelete.
Locate the disk with the damaged file system. Most likely R-Undelete will show Unallocated or Unrecognized Space instead of any file system on it. You may also look at the disk's size to recognize the disk.
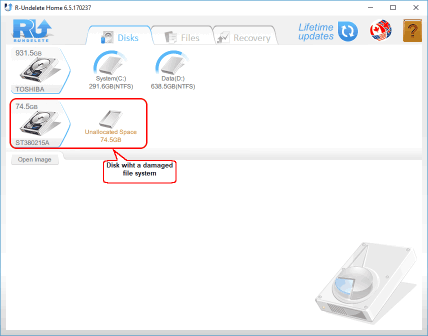
Fig.4. R-Undelete: Disk with a damaged file system
Click image to enlarge
It's a good idea to check the S.M.A.R.T. attributes for the disk to be sure that it's in good conditions. Right-click the disk and select Show S.M.A.R.T. on the shortcut menu.
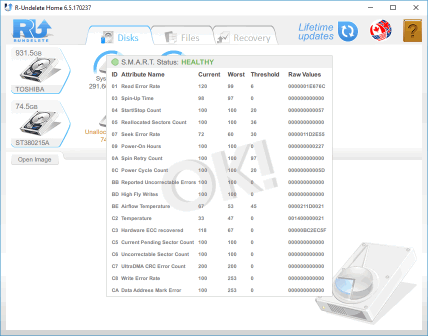
Fig.5. S.M.A.R.T. attributes for the disk with a damaged file system
Click image to enlarge
If the health status is Caution, there are possible some small problems with the disk in the future, you may work with it but with cautions and regular check of these parameters. Disk imaging is recommended, although that may require additional storage space.
If the health status is Bad, the disk conditions are critical and chances of hardware failure are great. The best recommendation for this case is to stop working with the disk and bring it to professional data recovery specialists. You may though continue to work with the disk at your own risk, but disk imaging is very strongly recommended.
4. After checking the S.M.A.R.T. status, move the mouse cursor over the Unrecognized Space and click Scan for Partitions.
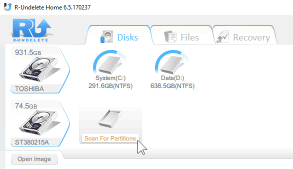
Fig.6. Scan for Partitions
Click image to enlarge
R-Undelete will start scanning the disk showing its progress. Please be patient as scan of large disks may be quite lengthy.
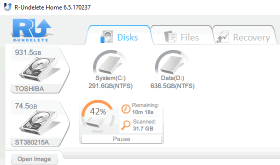
Fig.7. Disk Scan Progress
Click image to enlarge
5. When the scan is over, locate the original logical disk.
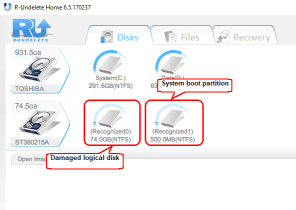
Fig.8. Discovered logical disks
Click image to enlarge
Windows creates at least two partitions on a system hard drive, a system boot partition and system logical disk. They can be easily told which one is which by their size. The system boot partition is quite small, up to 1 GB, while the system disk is much larger, at least several dozen GBs. You lost files are located on the system disk.
When you select a partition, click Show Files, and R-Undelete will start enumerating files on it.
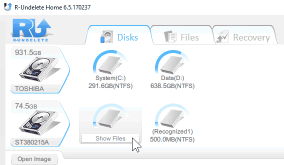
Fig.9. File Enumeration
Click image to enlarge
6. Find lost files and mark them for recovery.
You may do that as follows:
* Browsing the folder tree.
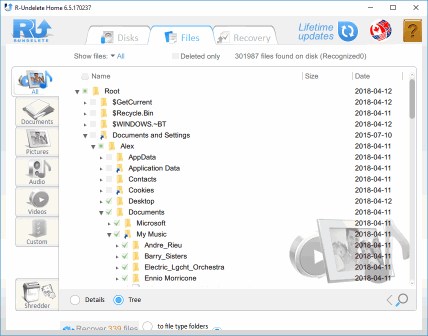
Fig.10. Files and folders marked for recovery
Click image to enlarge
* Sorting them by filetype.
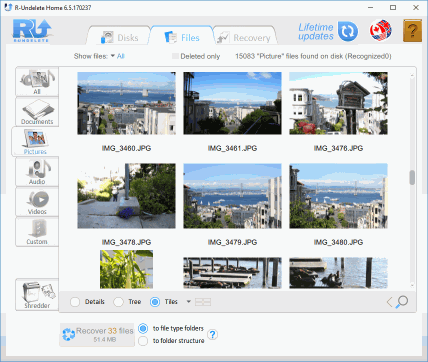
Fig.11. Files sorted by their types
Click image to enlarge
Such file search is very important, as files in a damaged file system may appear in any, sometimes very strange, place on the disk.
* Direct search for specific files and time stamps.
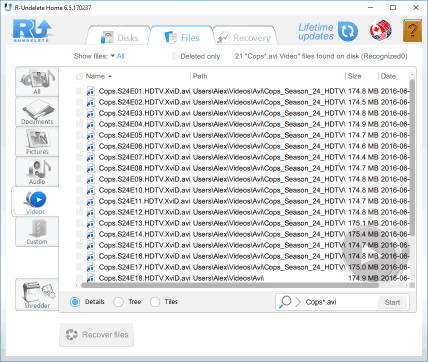
Fig.12. Search for specific files
Click image to enlarge
See R-Undelete on-line help: File Sorting and File Search for more file search options.
Please note that once marked for recovery, a file or folder will remain marked even when you switch, say, from the real folder tree to files sorted by their extension. You must explicitly unmark a file if you don't want to recover it.
While marking files for recovery, you may also estimate chances that R-Undelete can successfully recover them. Double-click a file to preview it and see the results.
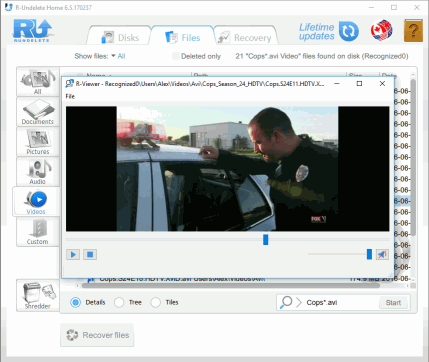
Fig.13. File preview for a video file
Click image to enlarge
8. File Recovery
Now if you decide that R-Undelete can recover your lost files, you may purchase the license, if necessary, and register it on-the-fly without restarting the program. See the Installation/Uninstallation page for more details.
Once you have marked all files for recovery, click the Recover button and select a place to store them.
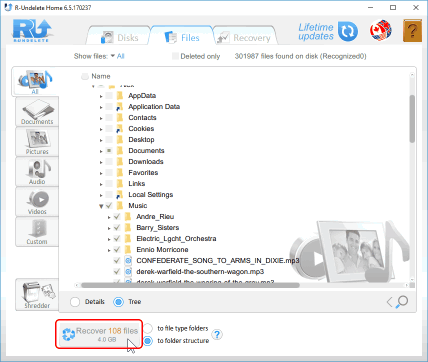
Fig.14. File Recovery
Click image to enlarge
When R-Undelete finishes the process, it will display a brief report about its results and opens the folder with recovered files. You may go to the folder with the recovered files to view them.
- R-Studio Technician: activation using a USB stick
- Data Recovery Guide
- Why R-Studio?
- R-Studio for Forensic and Data Recovery Business
- R-STUDIO Review on TopTenReviews
- File Recovery Specifics for SSD devices
- How to recover data from NVMe devices
- Predicting Success of Common Data Recovery Cases
- Recovery of Overwritten Data
- Emergency File Recovery Using R-Studio Emergency
- RAID Recovery Presentation
- R-Studio: Data recovery from a non-functional computer
- File Recovery from a Computer that Won't Boot
- Clone Disks Before File Recovery
- HD Video Recovery from SD cards
- File Recovery from an Unbootable Mac Computer
- The best way to recover files from a Mac system disk
- Data Recovery from an Encrypted Linux Disk after a System Crash
- Data Recovery from Apple Disk Images (.DMG files)
- File Recovery after Re-installing Windows
- R-Studio: Data Recovery over Network
- How To Use R-Studio Corporate Package
- Data Recovery from a Re-Formatted NTFS Disk
- Data Recovery from an ReFS disk
- Data Recovery from a Re-Formatted exFAT/FAT Disk
- Data Recovery from an Erased HFS Disk
- Data Recovery from an Erased APFS Disk
- Data Recovery from a Re-Formatted Ext2/3/4FS Disk
- Data Recovery from an XFS Disk
- Data Recovery from a Simple NAS
- How to connect virtual RAID and LVM/LDM volumes to the operating system
- Specifics of File Recovery After a Quick Format
- Data Recovery After Partition Manager Crash
- File Recovery vs. File Repair
- Data Recovery from Virtual Machines
- How to Recover Files from a Remote Computer Using R-Studio Standalone License and Its Network Capabilities in Demo Mode
- How to Connect Disks to a Computer
- Emergency Data Recovery over Network
- Data Recovery over the Internet
- Creating a Custom Known File Type for R-Studio
- Finding RAID parameters
- Recovering Partitions on a Damaged Disk
- NAT and Firewall Traversal for Remote Data Recovery
- Data Recovery from an External Disk with a Damaged File System
- File Recovery Basics
- Default Parameters of Software Stripe Sets (RAID 0) in Mac OS X
- Data Recovery from Virtual Hard Disk (VHD/VHDX) Files
- Data Recovery from Various File Container Formats and Encrypted Disks
- Automatic RAID Parameter Detection
- IntelligentScan Data Recovery Technology
- Multi-pass imaging in R-Studio
- Runtime Imaging in R-Studio
- Linear Imaging vs Runtime Imaging vs Multi-Pass Imaging
- USB Stabilizer Tech for unstable USB devices
- Joint work of R-Studio and PC-3000 UDMA hardware
- Joint work of R-Studio and HDDSuperClone
- R-Studio T80+ - A Professional Data Recovery and Forensic Solution for Small Business and Individuals Just for 1 USD/day
- Backup Articles
- R-Drive Image Standalone and Corporate license transferring
- Fixing Windows update error 0x80070643 with R-Drive Image
- Backup with Confidence
- R-Drive Image as a free powerful partition manager
- Computer Recovery and System Restore
- Disk Cloning and Mass System Deployment
- Accessing Individual Files or Folders on a Backed Up Disk Image
- R-Drive Image startup / bootable version
- File Backup for Personal Computers and Laptops of Home and Self-Employed Users
- Creating a Data Consistent, Space Efficient Data Backup Plan for a Small Business Server
- How to Move the Already Installed Windows from an Old HDD to a New SSD Device and Create a Hybrid Data Storage System
- How to Move an Installed Windows to a Larger Disk
- How to Move a BitLocker-Encrypted System Disk to a New Storage Device
- How to backup and restore disks on Linux and Mac computers using R-Drive Image
- R-Drive Image and Virtual Machines
- Undelete Articles
- Get Deleted Files Back
- Free Recovery from SD and Memory cards
- R-Undelete: Video Recovery
- Recovery from an External Device with a Damaged File System
- File recovery from a non-functional computer
- Free File Recovery from an Android Phone Memory Card
- Free Photo and Video File Recovery Tutorial
- Easy file recovery in three steps
Rating: 4.9 / 5
This is the easiest and the quickest data recovery software I have come across. I had to recover photos and videos out of the corrupted SD card, I tried other paid software which takes 8 hours of the deep scan to come up with less than 50% of data to recover.
R-Photo did that in a few minutes and recovered more than 35 GB of photos & videos in less than an hour, without missing a single file.
Highly Recommended.