-
Easy file recovery in three steps
A common misunderstanding of file recovery is that it is a kind of voodoo magic that only people initiated into this practice can perform. If you've lost your files, you have to either accept it or pay a large sum to a professional data recovery service. In reality, this is not true. For the most file recovery cases an ordinary computer user may run into, file recovery is simple and easy as 1-2-3. You just need to know how to do that.
This article will show you how to perform those 3 steps to retrieve your lost files. It will give you a general overview and understanding of this process. Then you may read more about some specific file recovery cases in our other articles that may discuss your specific case. You'll find links to them at the end of this article.
Those articles are intended for common computer users and don't require deep knowledge of computer science, but at the same time they'll give you enough information to understand how file recovery works, what results may be expected, and how to perform all necessary actions in various file recovery scenarios.
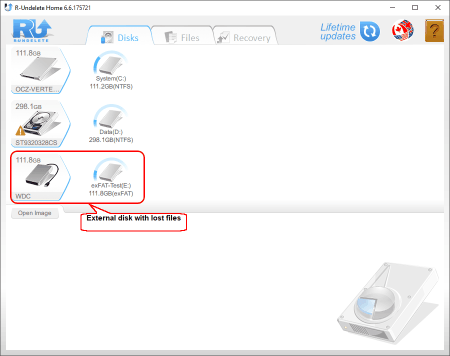
As an example, we'll use a common file recovery case: several music files and one Adobe pdf document on an external exFAT disk were mistakenly moved to the Recycle Bin, and then the Recycle Bin was emptied. We need to recover them.
We start with 3 preliminary steps.
- We need to select proper file recovery software. A good choice is R-Undelete Home, a program that combines a very easy-to-use interface with a powerful data recovery engine also used in R-Studio, a reputable professional data recovery program. In addition, it recovers files from FAT/exFAT disks for free, that is, we won't need to buy and register this program to complete the process.
Note: if our case was lost video/image files, our choice would be R-Photo because it recovers such files from disks with all Windows file systems (FAT, exFAT, NTFS, and ReFS) without any registration. If this is your case, you may move to another article: Free Photo and Video File Recovery Tutorial, and follow its instructions. - We need to download and install R-Undelete. If necessary, read Installation/Uninstallation instructions for more detail. And above all: Never install R-Undelete on the disk where the lost files resided or you may lose them for good!
- We need to prepare enough storage space to save the recovered files. It may be a local disk in the computer, another external USB device, or a network drive. R-Undelete can write files to any storage place visible to the host system.
When all these 3 preliminary steps are completed, we can start actual file recovery in 3 steps, too.
Step 1
Run R-Undelete and locate the disk where the lost files resided.
Click image to enlarge
We strongly recommend you start any operations with hard disks by checking its hardware health. If it seems that the disk has some hardware issues, stop working with it. Any tampering with a malfunctioning disk may seriously deteriorate its conditions up to its total failure. You may completely lose all your files if that happens.
Signs that a hard disk is failing:
- Your system cannot recognize the disk during startup, or it appears under strange names.
- The disk makes some unusual noise, clicks, and other strange sounds.
- The disk's S.M.A.R.T. attributes show some issues.
If any of these signs appears, go to data recovery professionals, or at least, create an image of the disk and use that image for file recovery. If necessary, read the R-Undelete online help regarding Disk Images to learn how to work with images: Disk Images.
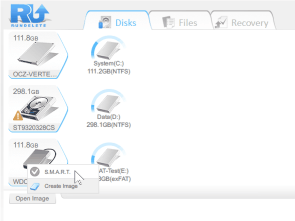
You may use R-Undelete to check a disk's S.M.A.R.T. status by right-clicking the disk and selecting the S.M.A.R.T. option.
Click image to enlarge
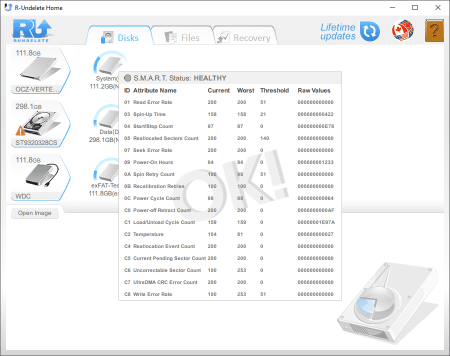
R-Undelete will show disk's S.M.A.R.T. attributes.
Click image to enlarge
The S.M.A.R.T. status of our disk is OK and we may proceed with file recovery.
By the way, the other disk, ST9320328CS, has the S.M.A.R.T. warning of "Caution". It may work for a while, but it's a good precaution to avoid storing valuable data on this disk.
Step 2
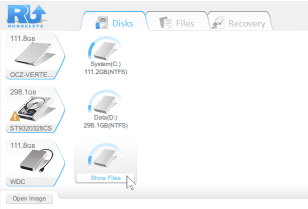
Right-click Disk E: and select Show Files.
Click image to enlarge
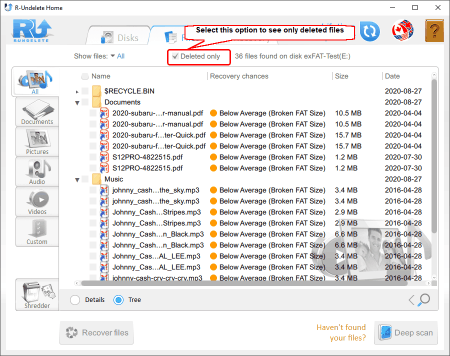
R-Undelete will start enumerating files. When the enumeration is over, R-Undelete will show the found files.
Click image to enlarge
Now you need to find the lost files. The first step is to select the Deleted only option to see only deleted files.
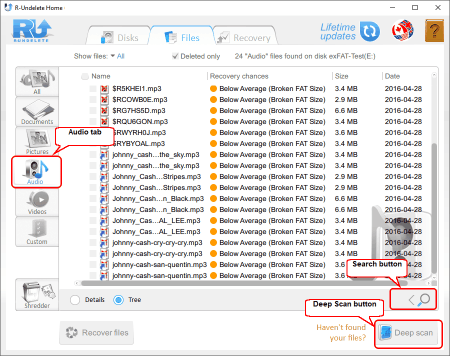
Then you may use file presorting according to file types and direct search for specific files:
Click image to enlarge
You may read more about file sorting and search in R-Undelete on-line help: File Sorting and File Search.
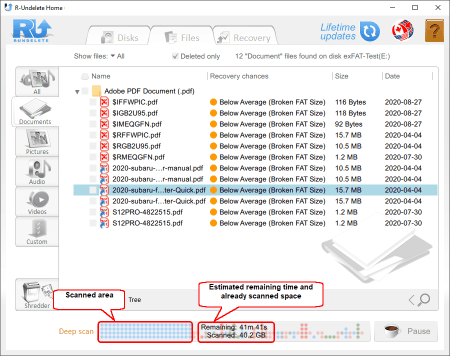
If you still cannot find some of your lost files, you may use Deep Scan. During this procedure R-Undelete thoroughly analyses all data on the disk and may find more files. It also enhances estimations of chances for successfully file recovery.
Click the Deep Scan button to start this procedure.
Click image to enlarge
Then you may estimate chances for successful file recovery. This is especially important when you have to use a paid version of R-Undelete.
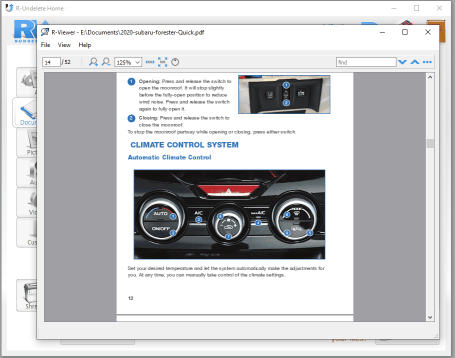
R-Undelete shows its estimations in the Recovery chances column. But these are only estimations which could be right or wrong. A much better way is to use a built-in file preview. Double-click the file to preview it.
Click image to enlarge
If you believe that chances for successful recovery are high, buy the program and register it if necessary (file recovery from NTFS and unrecognized/unsupported file systems). Read the Installation/Uninstallation if necessary.
As we're recovering files from an exFAT disk, we don't need registration.
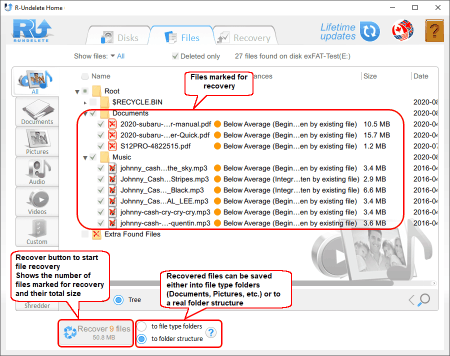
When you find all lost files, mark them for recovery and click the Recover button.
Click image to enlarge
Step 3
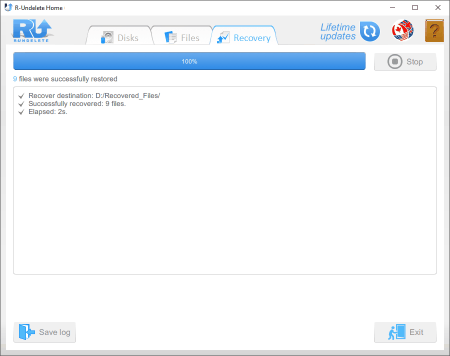
R-Undelete will start file recovery. When this process is over, the program will show a brief report
Click image to enlarge
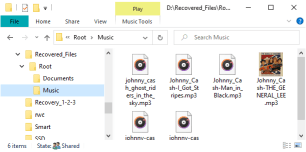
and open the folder with recovered files.
Click image to enlarge
File recovery is over.
Conclusions:
As our example has shown, file recovery is quite easy and can be performed in most cases by a regular computer user.
You may find more detailed instructions for various file recovery cases in the following articles:
- Get Deleted Files Back
- Free Recovery from SD and Memory cards
- File Recovery from an External Disk with a Damaged, Deleted, Formatted, or Unsupported File System
- File recovery from a non-functional computer
- Free File Recovery from an Android Phone Memory Card
You may also find useful our article on file recovery basics and possible outcome:
- R-Studio Technician: activation using a USB stick
- Data Recovery Guide
- Why R-Studio?
- R-Studio for Forensic and Data Recovery Business
- R-STUDIO Review on TopTenReviews
- File Recovery Specifics for SSD devices
- How to recover data from NVMe devices
- Predicting Success of Common Data Recovery Cases
- Recovery of Overwritten Data
- Emergency File Recovery Using R-Studio Emergency
- RAID Recovery Presentation
- R-Studio: Data recovery from a non-functional computer
- File Recovery from a Computer that Won't Boot
- Clone Disks Before File Recovery
- HD Video Recovery from SD cards
- File Recovery from an Unbootable Mac Computer
- The best way to recover files from a Mac system disk
- Data Recovery from an Encrypted Linux Disk after a System Crash
- Data Recovery from Apple Disk Images (.DMG files)
- File Recovery after Re-installing Windows
- R-Studio: Data Recovery over Network
- How To Use R-Studio Corporate Package
- Data Recovery from a Re-Formatted NTFS Disk
- Data Recovery from an ReFS disk
- Data Recovery from a Re-Formatted exFAT/FAT Disk
- Data Recovery from an Erased HFS Disk
- Data Recovery from an Erased APFS Disk
- Data Recovery from a Re-Formatted Ext2/3/4FS Disk
- Data Recovery from an XFS Disk
- Data Recovery from a Simple NAS
- How to connect virtual RAID and LVM/LDM volumes to the operating system
- Specifics of File Recovery After a Quick Format
- Data Recovery After Partition Manager Crash
- File Recovery vs. File Repair
- Data Recovery from Virtual Machines
- How to Recover Files from a Remote Computer Using R-Studio Standalone License and Its Network Capabilities in Demo Mode
- How to Connect Disks to a Computer
- Emergency Data Recovery over Network
- Data Recovery over the Internet
- Creating a Custom Known File Type for R-Studio
- Finding RAID parameters
- Recovering Partitions on a Damaged Disk
- NAT and Firewall Traversal for Remote Data Recovery
- Data Recovery from an External Disk with a Damaged File System
- File Recovery Basics
- Default Parameters of Software Stripe Sets (RAID 0) in Mac OS X
- Data Recovery from Virtual Hard Disk (VHD/VHDX) Files
- Data Recovery from Various File Container Formats and Encrypted Disks
- Automatic RAID Parameter Detection
- IntelligentScan Data Recovery Technology
- Multi-pass imaging in R-Studio
- Runtime Imaging in R-Studio
- Linear Imaging vs Runtime Imaging vs Multi-Pass Imaging
- USB Stabilizer Tech for unstable USB devices
- Joint work of R-Studio and PC-3000 UDMA hardware
- Joint work of R-Studio and HDDSuperClone
- R-Studio T80+ - A Professional Data Recovery and Forensic Solution for Small Business and Individuals Just for 1 USD/day
- Backup Articles
- R-Drive Image Standalone and Corporate license transferring
- Fixing Windows update error 0x80070643 with R-Drive Image
- Backup with Confidence
- R-Drive Image as a free powerful partition manager
- Computer Recovery and System Restore
- Disk Cloning and Mass System Deployment
- Accessing Individual Files or Folders on a Backed Up Disk Image
- R-Drive Image startup / bootable version
- File Backup for Personal Computers and Laptops of Home and Self-Employed Users
- Creating a Data Consistent, Space Efficient Data Backup Plan for a Small Business Server
- How to Move the Already Installed Windows from an Old HDD to a New SSD Device and Create a Hybrid Data Storage System
- How to Move an Installed Windows to a Larger Disk
- How to Move a BitLocker-Encrypted System Disk to a New Storage Device
- How to backup and restore disks on Linux and Mac computers using R-Drive Image
- R-Drive Image and Virtual Machines
- Undelete Articles
- Get Deleted Files Back
- Free Recovery from SD and Memory cards
- R-Undelete: Video Recovery
- Recovery from an External Device with a Damaged File System
- File recovery from a non-functional computer
- Free File Recovery from an Android Phone Memory Card
- Free Photo and Video File Recovery Tutorial
- Easy file recovery in three steps
Rating: 4.9 / 5
This is the easiest and the quickest data recovery software I have come across. I had to recover photos and videos out of the corrupted SD card, I tried other paid software which takes 8 hours of the deep scan to come up with less than 50% of data to recover.
R-Photo did that in a few minutes and recovered more than 35 GB of photos & videos in less than an hour, without missing a single file.
Highly Recommended.


